How to Format a Document in Word?
Formatting a Word document requires a few techniques and tools. These let users adjust the layout and appearance of their content. Options like changing margins, fonts, and adding headers and footers are all available in Word. How to format a document in word?
Format a Document in Word

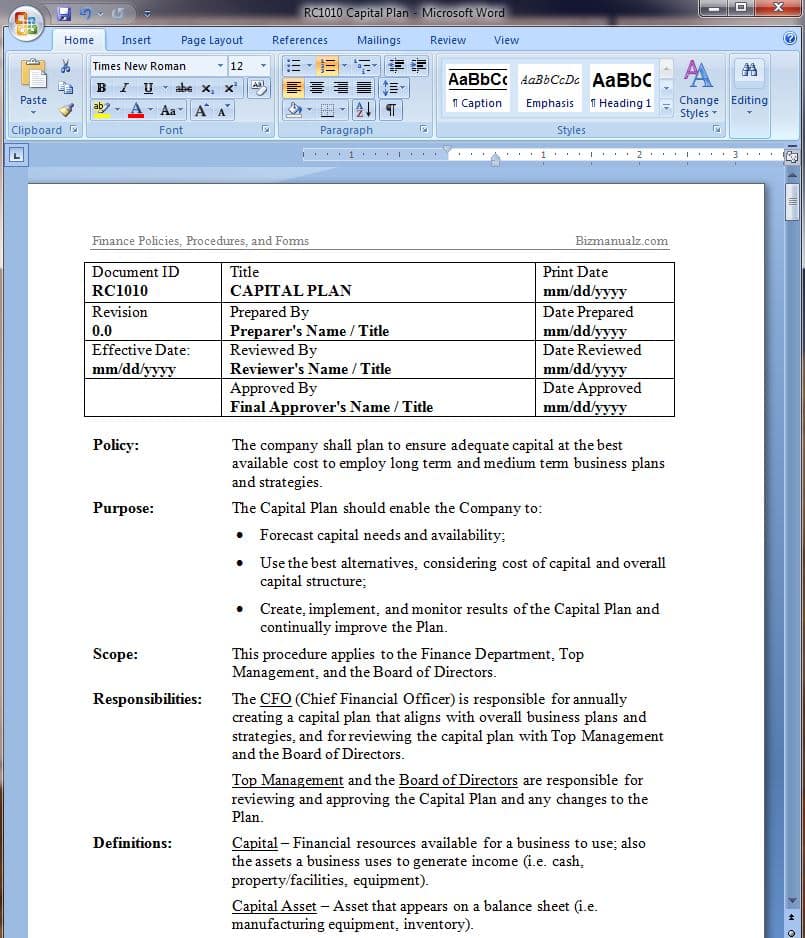
IT Policies and Procedures Template Manual | ABR34M Information Security Policy Manual
First, open the program and create a new file. Then, alter the font style, size, and color. Plus, add bold or italics for emphasis. To improve readability and visual appeal, modify page layout. Change margins to make the document narrower or wider. Or add columns to organize info.
Headers and footers help to include information like page numbers, author names, or section titles at the top or bottom of each page. Finally, insert and format images and tables in the document. This makes the content more attractive and helps convey info effectively.
Fun Fact: Word is used by over a billion people! Formatting documents in Word can be enjoyable.
Understanding the basics of document formatting in Word
Alignment is key when you’re formatting a Word document; by default, text is set to the left. But you can change this, choosing from center, right, etc. Font selection matters too; Word has lots of fonts to pick from. Plus, customizing size, style, color, kerning and leading adds emphasis. Headings and subheadings help readers know what’s what.
Did you know document formatting has changed heaps since early Word versions? In the past, documents were plain blocks. Now Word offers lots of features to make documents look stylish. So, you can fit the square peg in the round hole – with a bit of flair!
Setting up the document and page layout
Choose the ‘Layout’ tab in your Word toolbar to customize page size and orientation. Select from standard letter size or a custom dimension. You can also opt for portrait or landscape. Then, go to the ‘Margins’ option in ‘Layout.’ Pick predefined margins or enter your own measurements. Likewise, click the ‘Paragraph’ dialog box launcher in the ‘Home’ tab to change indentation settings.
Also, add headers and footers with the ‘Insert’ tab for a professional look. You can use preset designs or create custom ones. Add page numbers, branding elements, and more! Furthermore, pick readable fonts, sizes, line spacing, and styles. This will both make the document look better and make it accessible.
Fun fact: Microsoft Office Support is the source of this info! Give your words a makeover by jazzing them up with different fonts.
Applying font styles and formatting
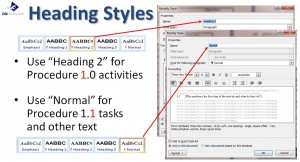
Procedure Heading Styles
When applying font styles and formatting, remember: consistency is key! Align headings, maintain uniformity in font sizes, colors, and spacing to enhance the overall visual appeal of your document.
To further improve readability:
- Use bullet points or numbering lists to present information.
- Utilize heading styles for section organization.
- Incorporate subheadings to break up paragraphs.
- Add relevant images or graphics.
- Proofread carefully for errors.
- Request feedback for clarity and effectiveness.
By following these suggestions, you can create a professional document that effectively conveys your message… and put your in-laws in their place, even during family dinners!
Adjusting paragraph formatting
Tailor-make your paragraph formatting in Word with ease! Here’s how:
- Highlight the text or paragraph you want to format.
- Go to the “Home” tab and find the “Paragraph” section.
- Click on the small arrow at the bottom right corner of the “Paragraph” section to open the dialog box.
- In the box, you can adjust options like alignment, indentation, line spacing, etc.
Plus, you can customize other settings like character spacing and drop caps for a polished look.
Bonus Tip: Speed up the process with keyboard shortcuts such as Ctrl+M for paragraph indentation and Ctrl+0 to remove paragraph spacing.
Headers and footers: Give your document a signature stamp, just like a pup marking every tree in the park!
Adding headers and footers
Place the cursor at the start of the page for a header or footer. To access the tab, go to the top menu and select “Insert”. Pick from pre-made designs or make your own. Personalize it with page numbers, document title, author name, dates and more. Try out various styles and layouts for a professional look.
Properly formatted headers and footers give readers an easy way to navigate. To insert page numbers, go to the “Design” tab and click “Page Number”. Now you know how to add headers and footers in Word! Make it even better with images and formatting. Fun fact: Headers have been used for centuries by scribes to identify content quickly.
Inserting and formatting images
Open Microsoft Word and go to where you want to add an image.
- Click the “Insert” tab at the top.
- In the “Illustrations” group, choose the “Picture” option.
- Now a dialog box will appear so you can select an image from your computer or network.
- Choose the image you want to insert and click “Insert”.
- The chosen image will be in your document at the cursor’s location.
To format it, double-click on the image or right-click and pick “Format Picture”.
A sidebar will appear with options like adjusting brightness, contrast, size, position, or adding artistic filters. You can also right-click the image to align it with text wrapping preferences or add alternative text for screen readers.
To make your document look better, consider these tips:
- Resize images proportionally to fit without distorting them.
- Apply consistent formatting styles to all images.
- Add informative captions below each image with Word’s caption feature.
- Compress large images without compromising their quality.
This will help improve readability and accessibility for readers. Formatting tables and lists in Word is like playing Tetris – try to avoid breaking the reader’s patience!
Using formatting tools for tables and lists
Use formatting tools to tut info in bullet points or numbered lists. This gives a clear, structured layout, so readers can follow along easily. Change indentation for better readability. Aligning the text looks more professional and attractive.
Try different table styles to show data clearly. Options like shading, borders, and alternating row colors, help to highlight crucial info and improve clarity. Employ column formatting to show data concisely. This feature lets you adjust the width of each column, to keep content tidy.
To make docs more functional and stylish:
- Include captions or titles to give context. Captions help readers grasp the purpose of the table quickly.
- Use sorting options in tables to arrange data logically. Sorting alphabetically or numerically makes info easier to understand.
- Merge or split cells when needed. This is handy when dealing with complex tables that require merging headers or splitting cells for extra content.
By using these tools properly, you can make eye-catching documents with organized tables and lists. These will grab readers’ attention while conveying data concisely. Lastly, hyperlinks are shortcuts in a document – they won’t get you to work on time, unfortunately!
Adding and formatting hyperlinks
To add a hyperlink to a Word document, follow these steps:
- Open the Word doc where you want to add a hyperlink.
- Select the text/image to turn into a link.
- Right-click and choose “Hyperlink” from the drop-down menu.
- In the “Insert Hyperlink” window, enter a web address or browse for a file on your computer.
- Customize the look of the link using font color, underline style, and hover effects from the format settings.
- Click “OK” to insert and format the link in the Word doc.
Hyperlinks make readers access related resources without leaving the document. Enhancing its value with connectivity between info sources.
I recently created a report in MS Word and included numerous hyperlinks. It impressed my colleagues, helping them locate info quickly, making collaboration more efficient. As I clicked “Save” with a smirk, I knew the document was ready!
Finalizing the document
It’s important to finalize documents in Microsoft Word correctly. Here are some key steps to follow:
- Review the document for any mistakes. Check for typos, grammar, and formatting issues. Fixing these mistakes will improve the overall quality.
- Look at the structure. Use headings and subheadings to separate sections. This will make it easier to read.
- Add visuals if they can help understanding. However, don’t use too many or ones that are unnecessary.
- Ensure consistency. Check headings, fonts, and spacing are the same. This makes it look professional.
- Add page numbers if needed. This makes it easier to refer to sections.
- Proofread. Read through your document from start to finish. Check for errors you may have missed.
By following these steps, your Word document will be polished, professional, and ready to share or print.
Frequently Asked Questions
 1. How do you change the font style and size in Word?
To change the font style and size in Word, select the text you want to modify. Then, go to the “Home” tab, locate the “Font” group, and use the drop-down menus to choose a new font style and size.
2. How do you adjust margins in Word?
To adjust margins in Word, go to the “Layout” tab and click on the “Margins” button. Choose one of the predefined margin settings or click on “Custom Margins” to set your own margins.
3. Can I add bullets or numbering to my document in Word?
Yes, you can add bullets or numbering to your document in Word. First, select the text you want to format, then go to the “Home” tab and locate the “Paragraph” group. Click on the bulleted list or numbered list buttons to apply the formatting.
4. How do I insert headers and footers in Word?
To insert headers and footers in Word, go to the “Insert” tab and click on either the “Header” or “Footer” button. Choose one of the predefined options or select “Edit Header” or “Edit Footer” to customize your own headers and footers.
5. Can I change the page orientation in Word?
Yes, you can change the page orientation in Word. Go to the “Layout” tab and click on the “Orientation” button. Choose either “Portrait” or “Landscape” to change the page orientation accordingly.
6. How do I apply different page numbering formats in Word?
To apply different page numbering formats in Word, go to the “Insert” tab and click on the “Page Number” button. From the drop-down menu, select “Format Page Numbers” and choose the desired numbering format or customize it as per your requirements.


How do I remove shading from the background of a document in Word 2013? I cannot find the format section in this version?
Open your Word document in Word 2013.
Go to the “Design” tab on the ribbon at the top of the Word window.
Look for the “Page Color” option, which is located in the “Page Background” group.
Click on the drop-down arrow next to “Page Color.”
Select “No Color” from the drop-down menu. This will remove any shading or background color from your document.
That’s it! The shading from the background of your document should now be removed. If you want to apply a different background color or shading, you can also select a different color from the “Page Color” drop-down menu.