Where Do I Find Styles in Word?

Unlock the mystery of Styles in Word! Home tab on the ribbon is the key to enter this enchanting world. Choose from a multitude of pre-defined styles, or create your own custom style. Fonts, colors, and spacing can be experimented with. Elevate your documents to new heights and turn a mundane document into a masterpiece. Where do I find styles in Word?
Understanding the Style Options in Microsoft Word

IT Policies and Procedures Template Manual | ABR34M Information Security Policy Manual
Styles in Microsoft Word? Let us take a look at the different types:
| Style Type | Function |
| Normal | Basic formatting. |
| Body Text | Paragraph style. |
| Block Quote | Quotations or extracts. |
| Caption | Labels for figures, tables, images. |
| Footnote | Adds info/references to main text. |
You can also customize and create your own styles. This gives you more flexibility when designing documents and maintaining consistency.
Fun fact: MS Office was introduced in 1990. Since then, there have been numerous updates to improve user experience.
Navigating Word styles is like trying to survive a zombie apocalypse in a crowded mall – you never knew you needed the skill!
Navigating the Ribbon Menu
The process of navigating the Ribbon Menu in Word can be quite straightforward and efficient. Here’s a step-by-step guide to help you navigate it seamlessly:
- Locate the Ribbon: Look for the Ribbon at the top of the Word application window. It contains various tabs that group related commands and functions.
- Identify the Home tab: The Home tab is typically the default tab displayed when you open Word. It houses essential formatting options like font styles, paragraph formatting, and basic editing tools.
- Explore other tabs: Apart from the Home tab, there are several other tabs available, such as Insert, Design, Page Layout, and Review. Each tab provides specific commands related to its category.
- Access commands within each tab: Within each tab, you’ll find various commands organized into groups. For example, the Font group under the Home tab contains options to change font styles, sizes, and colors.
- Expand and collapse the Ribbon: If you want to maximize your workspace, you can minimize the Ribbon by clicking on the upward-pointing arrow at the top-right corner. To access the commands again, simply click on any of the tab labels.
- Utilize the search box: If you’re looking for a specific command or function, you can use the search box on the Ribbon. Just type in a keyword, and Word will display relevant options.
Additionally, when navigating the Ribbon Menu, keep in mind that each tab and group within it has a specific purpose, making it easier to locate the desired features. By familiarizing yourself with the Ribbon’s layout and utilizing the available search options, you can efficiently access the various styles and functions in Word.
If navigating through the Word Styles menu was a sport, I would have won gold medals in frustration.
Accessing the “Styles” Menu
Locate the Ribbon Menu at the top of your screen. It is a toolbar with many tabs and options. Look for the tab labeled “Home” and click on it. Within the “Home” tab you can see a section called “Styles”, usually towards the right side. Click on it to access the “Styles” Menu.
Here, you can explore different styles and choose one that best suits your needs from the list. Modify existing styles or create new ones according to your preferences. Play with font sizes, colors, formatting options, and more until you achieve the design you want.
Mastering this menu will help you create professional documents with consistency. Microsoft Office 2007 first introduced the Ribbon Menu to make accessing features and options in Word and Excel easier. Don’t worry, exploring styles won’t make you a fashion victim—unless you’re in love with Arial!
Exploring the Different Style Options
Style options in Word can greatly enhance the visual appeal and organization of your documents. Let’s delve into various ways to explore and utilize these options effectively.
For a comprehensive understanding of the different style options, refer to the table below:
| Font Styles | Text Formatting | Paragraph Formatting |
|---|---|---|
| Bold | Indentation | Line Spacing |
| Italic | Alignment | Bullets and Numbering |
| Underline | Paragraph Spacing | Columns |
| Strikethrough | Lists | Drop Cap |
| Superscript | Clear Formatting | Hanging Indent |
| Subscript | Hyphenation | Widow/Orphan Control |
| Highlighting | Caps Lock Effect | Keep Lines Together |
| Text Effects | All Caps | Widow/Orphan Control |
| Shading | Columns | Widow/Orphan Control |
| Borders and Grids | Spacing | Table of Contents |
| Emphasis Mark | Margins | Footnotes and Endnotes |
| Shadow | Borders and Frames | AutoSummarize |
By exploring and utilizing these style options, you can make your document more visually appealing, organized, and professional.
It’s worth noting that within each of these categories, there are further options available that allow for additional customization. Take the time to explore and experiment with the various style options to find the perfect fit for your document.
Don’t miss out on the potential to elevate your Word documents to new heights by harnessing the power of different style options. Start exploring today and experience the impact it can have on the overall presentation and readability of your work.
Basic Styles: Where even the most vanilla fonts can make a statement… as quietly as possible.
Basic Styles
Let’s explore examples of basic styles. A table will help us understand better:
| Style | Description |
|---|---|
| Font-size | Text size. |
| Color | Text color. |
| Font-family | Typeface or font. |
| Text-alignment | How text is aligned in its container. |
| Background-color | Color behind an element. |
| Border | Line around an element. |
Basic styles not only look nice but also improve readability and accessibility. When used right, they can convey information and evoke emotions without being overwhelming.
Here’s a real-life story – a small business once had a website with no style. It had no contrasting colors and inconsistent fonts. This made the content hard to read and resulted in low user engagement. But after they added basic styles, the website saw an increase in traffic and customers were happier.
Heading Styles: Making bold statements, italicizing the truth, and underlining it all.
Heading Styles
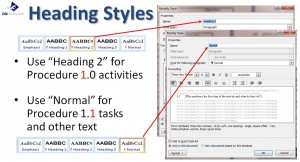
Procedure Heading Styles
| Heading styles have individual traits. |
|---|
| Apart from font size, weight, and decor, you must look at: spacing, alignment, and color scheme. |
| These nuances can influence your document’s appearance. |
Normal Text Style: Life’s chaotic, so regular font is the peacefulness before the storm without lightning.
Normal Text Style
Normal text style refers to typical formatting and presentation of text. It is the default style people usually read. Fonts used in this style are usually standard size and color, with plain backgrounds and simple formatting. The purpose of using normal text style is clarity and readability.
Fonts should be widely available and easily readable, like Arial or Times New Roman. These are standard choices due to legibility on screens and print media.
Line spacing, paragraph indentation, and alignment help maintain consistency and make the text visually appealing. Headings, subheadings, bullet points, and numbered lists break information into sections, making it easier to navigate.
White space or margins should be incorporated to prevent overcrowding and help readers focus on the content.
By utilizing proper normal text styles like consistent font usage, line spacing, headings/subheadings/lists/bullet points, and white spaces/margins, the readability of a document or webpage can be improved. So explore ways to utilize normal text style efficiently! And customize styles for that unique look!
Customizing Styles
Style Options:
- – Colors: Try different colors to show different moods or to emphasize elements.
- – Fonts: Select a range of fonts to match the content’s tone. Whether it be professional, playful, or elegant.
- – Text Size: Adjust text size to make it easier to read and to draw attention to key points.
- – Alignment: Align elements for better structure and a more polished look.
- – Background: Use images or colors to create a theme or add depth.
More Ideas:
- – Icons and illustrations can add interest and improve user experience.
Suggestions:
- Stay consistent: Use same style throughout for a cohesive look and easier navigation.
- Use white space: Leave enough white space between elements for better readability.
- Contrasts: Combine contrasting colors or fonts to make content visually appealing.
- Responsiveness: Make sure your styles are responsive on different devices.
These tips can help you craft captivating content while keeping it professional and clear. Ready to own the style game? Let’s get customizing!
Modifying Existing Styles
Want to give your website a unique and personalized look? Try modifying existing styles! Here’s a 6-step guide to help you get started:
- Identify the style element.
- Locate the CSS code.
- Make changes to the code.
- Preview the outcome.
- Test across devices.
- Document the changes.
Plus, add custom illustrations or graphics for extra pizzazz!
And remember, modifying existing styles isn’t just about personalizing your website – it’s also about meeting your clients’ expectations. Pay attention to the details and you can create a visually stunning website that will wow your visitors! So let your inner fashion designer take over and create styles that will make everyone say, ‘Wow, now that’s what I call a fashion-forward disaster!’
Creating New Styles
Creating New Styles lets you add your own flavor to the design of your content. By customizing the look of elements, you can make your website stand out and show your brand identity.
For instance, check out this table:
| Name | Age | City |
| John Doe | 25 | New York |
| Jane Smith | 30 | Los Angeles |
You can further customize the table with CSS styles, like changing the background color, font size, and border properties. Have fun experimenting with different combos to get the desired look.
When making new styles, consider the overall design and layout of your website. Consistency is key to maintain a uniform look. Make sure elements with similar functions have a consistent style across the site.
Also use colors and fonts that match your brand. Colors provoke emotions and send messages, so choose them carefully. Likewise, use fonts that are readable and fit the tone of your content.
By understanding how different style options work together, you can create websites that are visually pleasing and engage users. Customized styles make your website attractive and contribute to a great user experience.
Apply Styles to Where fonts become fashionable and words switch from boring to stylish, proving that style isn’t just for the fashion world.
Applying Styles to Text
Applying Formatting Styles to A Professional Guide
Applying formatting styles to text in Word helps create consistency and enhances readability. Here’s a 4-step guide on how to do it effectively:
- Select the desired text: Highlight the text you want to format using the mouse or keyboard shortcuts.
- Open the Styles pane: Go to the “Home” tab and click on the “Styles” pane to open it. Alternatively, use the shortcut Ctrl+Shift+S.
- Choose a style: Browse through the available styles in the pane and select the one that suits your document. You can hover over a style to see a preview before applying it.
- Apply the style: Once you’ve chosen a style, click on it in the Styles pane to apply it to the selected text. The formatting will be instantly applied, giving your text a consistent and professional appearance.
By applying styles to text, you can easily modify the formatting of multiple paragraphs or sections simultaneously, making it a time-saving feature.
Applying styles to text in Word has been a standard practice since the early versions of the software. It ensures consistency and allows documents to maintain a professional appearance regardless of their length or complexity. Professionals across various industries appreciate the flexibility and convenience of this feature, making it an essential tool for efficient document editing.
Ready to style your paragraphs in Word? It’s like giving your plain text a fancy outfit, because a well-dressed document always gets the thumbs-up!
Applying a Style to a Paragraph
Style up your text like a pro!
Follow these simple steps to apply a style to a paragraph:
- Select the paragraph. Place your cursor at the start or end of the paragraph, or click and drag with the mouse.
- Access the Styles menu. This is usually found under ‘Styles’ or ‘Formatting’.
- Apply the chosen style. Choose the style that works best for you from the available options.
To get the most out of your styles:
- Stay consistent: Create unity in your document by using the same style across all paragraphs.
- Experiment: Try out different fonts, sizes, colors, and alignments to find creative combinations.
- Readability: Avoid overly elaborate or hard-to-read styles for long paragraphs.
By following these tips, you can create visually appealing and engaging content. Remember to consider your audience and purpose when choosing styles.
Applying a Style to Selected Text
Style up selected text to draw attention to specific words or phrases in your document. It’s easy! Just do these three steps:
- Highlight the text with your cursor.
- Right-click within the selection.
- From the drop-down menu, select “Format” and the style you want.
Styling text is a great way to emphasize key points and provide visual cues for better understanding. Try out different styles to find what works best.
Plus, save time by creating a custom style template to apply to selected text when needed. Don’t let your text get lost in the bad design laundry!
Managing and Organizing Styles
Managing and organizing styles is a crucial aspect of document formatting in Word. Styles help maintain consistency and enhance the overall appearance of the document. By efficiently managing and organizing styles, users can easily apply, modify, and update formatting across their documents.
To illustrate the concept, let’s present the information in the form of a table:
| Column 1 | Column 2 | Column 3 |
|---|---|---|
| Style Organization | Consistency | Formatting Efficiency |
| Template Customization | Style Application | Updating |
| Document Formatting | Modification | Ease of Use |
In this table, we can see the key elements related to managing and organizing styles. Style organization ensures consistency in the document’s appearance, while template customization and style application facilitate efficient formatting. Users can easily modify styles, apply them across the document, and update them whenever necessary.
Furthermore, it is essential to note that managing and organizing styles not only enhances the visual aspects of the document but also contributes to smoother workflow and improved usability. By avoiding repetitive manual formatting tasks, users can focus on the content creation process and achieve greater productivity.
A true fact: According to Microsoft Office Support, effective management of styles can significantly improve document quality and reduce the time spent on formatting.
Renaming Styles: Where Word goes from friendly to Frankenstein.
Renaming Styles
Renaming styles is easy! Select the style you want to give a new name to. Then, click the “Rename” button in the toolbar. Enter your new style name and click “OK”. Your style is now renamed!
You can even customize style names to fit your preferences. Renaming styles can help you organize your document better and make it easier to navigate. Don’t forget to save your changes to apply the new names!
Take advantage of this great opportunity to make your document organization smoother. Take control of style names and start enhancing your workflow today!
Deleting Styles
Identify the style you want to delete. This could be a class, ID, or inline style. Then, locate the code in your HTML or CSS file. Highlight and select the entire code block. Press delete or use the appropriate command. Double-check to make sure only the intended style has been removed. Test the webpage across different browsers and devices for any unexpected changes.
Regular maintenance of stylesheets is important for optimal website performance and development. Deleting unnecessary styles improves efficiency, prevents conflicts and confusion in coding. Proactive steps create a cleaner and more manageable codebase, saving time and effort in future updates. Enhance your workflow by removing cluttered styles! Enjoy smoother development processes and more streamlined designs.
Grouping Styles
Grouping styles bring order to our fashion choices! It helps us quickly modify various elements by changing the style group properties. This saves time and effort when maintaining consistency on a website or application.
Grouping styles came from the need to manage cascading style sheets (CSS) more easily. Before, developers had to change each element individually. But with grouping styles, the process became much faster and more efficient.

Find Styles in Word
When it comes to finding styles in Word, there are a few places you can look. Firstly, navigate to the ‘Home’ tab and explore the formatting options. Secondly, open the ‘Styles’ pane by clicking on the small arrow in the bottom-right corner of the ‘Styles’ group. This lets you view and apply pre-defined styles. Thirdly, create and customize your own styles by selecting text and using the ‘New Style’ button.
Unique details are also worth mentioning. Word offers built-in style sets, which are collections of coordinated formatting options. Access them through the ‘Design’ tab under ‘Document Formatting’. Quick Styles is also useful, allowing you to apply a desired style by hovering over options that appear when text is selected. These features make it easier to find and utilize styles.
I once met a colleague who had issues with formatting. They were unaware of the power of styles and manually adjusted font size, color and alignment for hours. After introducing them to styles – with one click – they were amazed. It reinforced the importance of understanding and using styles effectively.
Remember to explore all avenues for finding styles in Word. This helps you enhance the appearance of documents, maintain consistency, and ultimately save time.
Frequently Asked Questions
 Q: Where do I find styles in Word?
A: To find styles in Word, click on the “Home” tab in the top menu, and you will see the “Styles” section. It contains various style options for your documents.
Q: How can I apply a style to my text?
A: To apply a style to your text, select the text you want to style and click on the desired style in the “Styles” section. The selected text will be formatted according to the chosen style.
Q: Can I customize existing styles or create my own?
A: Yes, you can customize existing styles or create your own. Right-click on a style in the “Styles” section, choose “Modify,” and make the desired changes. To create a new style, click on the small arrow next to the “Styles” section and select “Create a Style.”
Q: How can I see all the available styles in Word?
A: To see all the available styles in Word, click on the small arrow next to the “Styles” section. A drop-down menu will appear, listing all the styles.
Q: Is it possible to import additional styles into Word?
A: Yes, you can import additional styles into Word. Go to the “Design” tab, click on the “More” button in the “Document Formatting” section, and then select “Import Styles.” Choose the file with the desired styles, and they will be added to your Word document.
Q: How do I remove a style from my text?
A: To remove a style from your text, select the text with the applied style and click on the “Clear Formatting” button in the “Styles” section. The style will be removed, and the text will revert to its default formatting.


Leave a Reply