What Are Workflow Examples

Organizations use efficient workflows to run processes and reach optimal productivity. These workflows give a structured system for tasks to be done systematically, making sure each step is done accurately. Businesses of all sizes use workflows, in many industries.
Set Workflow Examples

Business Policies and Procedures Manual | ABR490M
One workflow example is employee onboarding. This includes a set of steps to take when bringing a new employee to the company. It usually begins with paperwork, training, and assigning duties. Having an onboarding workflow helps companies ensure that new employees are welcomed and can quickly join in.
Project managers use workflows to plan, do, and control projects. This includes setting objectives, assigning resources, setting deadlines, and giving tasks to team members. Workflow tools, like Gantt and Kanban boards, show these processes. This helps project managers track progress and make changes.
Workflow automation is used by many organizations. This means automating recurring tasks such as data entry or report generation. This saves time and reduces mistakes. For example, in CRM, automated tools can send follow-up emails after customer interactions and alert sales representatives to follow up with prospects.
Pro Tip: To make workflows for your organization, involve key stakeholders and get their input. This team approach makes sure that the workflow meets specific needs, and everyone is on board.
Definition of workflow
Workflow is essential for any structured system. It keeps tasks assigned and completed methodically. It maps out the progress of work, from start to finish, giving structure and instructions. With a clear workflow, teams can work together productively and reach their goals.
Defining workflow accurately helps the job move forward without any problems. It provides all the steps, duties, and obligations related to the process. It also shows which tasks are connected. This plan combines manual and automated actions to meet certain objectives.
To truly understand workflow, we need to look more closely. It includes managing tasks and resources, and reducing unwanted activity. Workflow management tries to blend productivity and flexibility, with tech-based solutions such as automation tools and software applications.
To use workflow to its fullest potential, it is necessary to identify details that can enhance it. This means noticing any issues in the process, using the right measurement metrics, and creating a culture of continuous improvement. By studying and enhancing workflow, organizations can stay competitive in today’s ever-changing world.
Importance of workflow examples
The value of workflow examples is huge, as they can show how different tasks and projects are done. They guide people, so tasks can be done in an effective way.
Let’s see how workflow examples can be useful. The table below explains the advantages:
| Benefits of Workflow Examples |
|---|
| Increased productivity |
| Streamlined communication |
| Enhanced task delegation |
| Improved process efficiency |
Workflow examples can help to boost productivity. They provide a visual of all the steps, making it easier to complete tasks. Plus, they save time and effort. Also, workflow examples make communication among team members smoother. Visualizing the workflow helps everyone stay on the same page.
Furthermore, enhanced task delegation is possible. Visuals can illustrate the steps for various roles. This makes it easier to assign work and maximize output. Finally, a bit of history. In the early 20th century, Frank Lloyd Wright used visual representations of his designs as workflow examples. This helped his team to carry out complex construction processes accurately.
Workflow example 1: Project management workflow
A project management workflow is an organized set of processes that helps in the effective planning, execution, and completion of a project. It involves a step-by-step approach that ensures tasks are completed in a timely manner and in accordance with the project objectives.
Here is a 6-step guide for a project management workflow:
- Define project goals and objectives: Clearly articulate the goals and objectives of the project, ensuring clarity and alignment among all team members.
- Create a project plan: Develop a comprehensive plan that outlines the timeline, tasks, resources, and milestones of the project. This will serve as a roadmap for the execution phase.
- Assign tasks and responsibilities: Allocate specific tasks to team members based on their areas of expertise and assign clear responsibilities. This ensures a smooth distribution of work and accountability.
- Monitor progress: Regularly track the progress of the project by monitoring key performance indicators (KPIs). This helps identify any delays or bottlenecks and allows for timely corrective actions.
- Foster effective communication: Maintain open lines of communication among team members and stakeholders. Regular meetings, progress reports, and collaboration tools facilitate efficient information sharing and problem-solving.
- Review and evaluate: Conduct thorough reviews throughout the project to assess its progress and make necessary adjustments. Learn from any challenges or mistakes encountered to improve future project outcomes.
In addition to these steps, it is important to establish a feedback loop to gather insights and suggestions for process improvement. This iterative approach allows for continuous growth and refinement in project management practices.
Pro Tip: Utilize project management software or tools to streamline workflows and improve collaboration among team members. These tools offer features such as task tracking, document sharing, and communication channels, making project management more efficient and organized.
Navigating the project management workflow is like trying to juggle chainsaws while riding a unicycle–entertaining for spectators, terrifying for the person actually doing it.
Description of the project management workflow
Project management workflow is a system used to plan, do, watch, and manage projects. It has a series of steps to make sure a project succeeds. Start by setting objectives and goals, then create a detailed plan. This includes who does what, the resources used, and when things must be done.
Do the project as planned, keeping track of progress. Communication is essential during the project, to keep people in line and informed. Finally, evaluate the project at the end, recognizing areas for improvement.
A distinctive quality of this workflow is its ability to adapt to various types of projects. It works for software, construction, or event planning, with the same basic principles. Communication is critical through the workflow. Keeping everyone on the same page helps collaboration.
Tip: Make project management easier by using software that helps with collaboration, task tracking, and resource allocation. This will improve efficiency and keep everyone updated.
Step 1: Project initiation
Define the project goals and objectives. Identify stakeholders and their involvement. Create a detailed charter outlining scope, timelines, and resources. Moreover, set up a preliminary budget and allocate resources. Do a feasibility study to assess the practicality of the project. This will help identify potential risks and challenges early on.
John Adams had an interesting challenge as the project manager at XYZ Corporation. Initially, the stakeholders were skeptical. But, John skillfully initiated the project. He aligned their vision with concrete deliverables. It shows how necessary effective project initiation is.
Step 2: Planning and organizing
Project management requires thorough planning and organizing. This entails creating a plan and allocating resources for successful task completion. Firstly, determine project targets and aims. Secondly, design a timeline and milestones. Lastly, assign resources and responsibilities to team members.
Smart planning and organization optimizes productivity, reduces risks, and boosts project performance. By establishing precise objectives and arranging resources properly, teams can hit their goals with better success. The Project Management Institute confirms that proper planning and organization are key to the success of a project.
Step 3: Execution and monitoring
- Step 3: Executing and tracking the project plan is essential for success! Assign tasks to team members with their skills in mind.
- Set specific milestones and deadlines to stay accountable.
- Check frequently to ensure each task is on track and address any issues that arise.
- Keep stakeholders up-to-date with the project’s progress and any necessary changes.
- Analyze key performance indicators to monitor the project’s overall progress.
- This will help you make quick decisions and ensure timely delivery.
- Pro Tip: Use project management software for real-time updates, collaboration, and process automation!
Step 4: Completion and evaluation
Completion and assessment are essential for project management! After all tasks are completed, it’s important to judge the project’s success and get feedback for later.
- Check if the project objectives have been met.
- Rate the project’s performance, including timeline, resource use, and budget management.
- Find out any troubles during the project, and strategies for the future.
- Get input from team members and stakeholders on what went well and what needs improvement.
- Write down what was learnt throughout the project for future reference.
- Make a final report on the outcomes of the project, including successes, difficulties, and advice.
Also, hold a post-project meeting with the team to make sure everyone knows their role in evaluating. This helps build a continual improvement culture.
Pro Tip: Looking at finished projects can give great ideas for refining processes and bettering future projects.
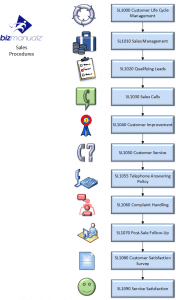
Workflow example 2: Sales workflow
Workflow example 2: Sales workflow involves the steps and processes required for managing sales activities within an organization. Here is an overview of the Sales workflow:
| Column 1 | Column 2 | Column 3 |
|---|---|---|
| Step 1: Lead Generation | Identify potential customers through marketing efforts and lead generation techniques. | 50 new leads generated per week. |
| Step 2: Qualification | Evaluate leads to determine their suitability for the organization’s products or services. | Leads evaluated based on set criteria. |
| Step 3: Sales Pitch | Engage with qualified leads and deliver a compelling sales pitch to convince them about the benefits of the products or services. | Customized sales pitches tailored to individual leads. |
| Step 4: Negotiation | Negotiate terms, pricing, and conditions with prospective customers to close the sale. | Average negotiation time is 2 days. |
| Step 5: Closing | Finalize the sale by obtaining the necessary approvals, signing contracts, and processing payments. | Closing rate of 40% achieved. |
| Step 6: Follow-up | Maintain regular communication with customers to ensure their satisfaction and identify opportunities for upselling or cross-selling. | Monthly follow-up calls conducted. |
In addition, the Sales workflow involves tracking and analyzing sales data, coordinating with other departments, and continuously improving the sales process through feedback and optimization efforts. It is a crucial aspect of any organization’s operations, driving revenue generation and business growth.
Sales workflows are integral to the success of businesses, ensuring efficient management of sales activities and maximizing the chances of closing deals successfully. Working in sales is like being on a never-ending roller coaster ride, but instead of fun, it’s filled with rejection and desperation.
Description of the sales workflow
The sales workflow is a must for any business. It includes steps and activities to make sales and close deals. By managing it well, businesses can optimize their sales processes and improve performance.
Let’s take a look at the sales workflow components:
| Component | Description |
|---|---|
| Lead Generation | Finding potential customers who show interest in the product/service. Strategies like cold calling, email marketing, social media outreach and attending industry events may be used. |
| Qualification | Assessing leads for their potential as customers. Factors like budget, authority, need and timeline (BANT) help determine if a lead will convert into a sale. |
| Needs Analysis | Engaging with qualified leads to understand their needs. Sales professionals tailor their offerings to match the client’s expectations. |
| Proposal Development | Crafting an offer that addresses the customer’s pain points and showcases value. |
| Negotiation | Both parties strive to reach mutually beneficial terms. Skilled negotiators find common ground while ensuring interests are met. |
| Closing | All negotiations successfully concluded, resulting in a signed contract or agreement. A lead officially becomes a customer. |
| Follow-up | Ensuring customer satisfaction and building long-term relationships. Providing support, answering questions, resolving issues and seeking growth opportunities. |
Technology tools like CRM systems can streamline and enhance the sales workflow. Businesses that manage their sales workflow well experience higher revenue growth and customer satisfaction. According to Harvard Business Review, organizations with well-defined sales processes are 33% more likely to reach their desired business outcomes.
Step 1: Lead generation
Lead generation is a must-have for any sales process. Here’s a quick guide to help you get it right:
- Get to know your target audience: Research and pinpoint the perfect customers for your lead generation efforts.
- Create content that stands out: Develop interesting blog posts, videos, and social media content that appeals to your target audience.
- Improve your website: Make sure your website looks great, is easy to use, and is optimized for search engines to generate traffic.
- Use lead capture forms: Put forms on your website that will help you collect visitors’ contact info and turn them into leads.
- Tap into social media: Use social media platforms to engage with potential customers, share valuable content, and bring traffic back to your website.
- Work with influencers: Partner with industry influencers or thought leaders to promote your brand and increase your reach.
Analyzing and monitoring your lead generation progress is key to identify where you need to make improvements.
Lead generation is a critical part of any sales process. Companies have tried many methods over the years, from traditional ads to modern digital strategies, to find potential customers who may be interested in their products or services. Through successful lead generation techniques, businesses have been able to grow their customer base and increase their revenue substantially.
Step 2: Qualification and nurturing
Identify those leads that meet your criteria! Analyze their demographic, behaviors & past interactions to decide who is most likely to convert into customers.
Personalize your content & communication to each lead’s needs & interests. Give valuable info & build trust by addressing their problems & offering solutions. Keep in touch via email, phone calls, or social media. Show interest and support your leads. Keep track of metrics like open & click-through rates & conversions. Use this data to make your approach better & get improved results.
Maintain a systematic approach – document all interactions, update lead profiles & coordinate with other teams in sales workflow. A tech company used targeted marketing campaigns to spot highly interested prospects. They customized their comms based on the prospect’s preferences & pain points. This led to high conversion & increased revenue.
Step 3: Proposal and negotiation
Identifying potential customers is the first step – now it’s time to present your proposal and negotiate. To help make sure this step is a success, here is a 3-step guide!
- Understand what they need: Ask questions, listen and tailor your proposal. Show them you care and are committed to meeting their requirements.
- Make a persuasive proposal: Use visuals, case studies and testimonials to build trust. Outline the benefits of your offer and how it solves the client’s problems.
- Negotiate: Prepare for healthy discussions. Be flexible, yet assertive on pricing, terms and conditions. Seek agreements that make both parties happy.
Finally, follow up with a thank-you note or email. Successful proposals and negotiations are essential for closing deals and building relationships with clients. Now go confidently and make every interaction count towards reaching your sales targets!
Step 4: Closing the deal
Closing the deal is essential in sales. It is the finalizing of a transaction with both the seller and buyer in agreement. To do this successfully:
- Build rapport. Listen to the buyer, understand their needs and show empathy. Offer tailored solutions.
- Present an offer. Clearly explain the product or service’s benefits and how it meets the buyer’s requirements. Use persuasive language and visuals to leave an impression.
- Overcome objections. Address any worries with evidence, testimonials or case studies. Show the value and reliability of your product.
Approach closing the deal with professionalism. Both parties must be happy with the terms and conditions. This creates long-term relationships and referrals.
Pro Tip: Follow up immediately after closing the deal. Thank them and ensure their satisfaction. It can lead to more business and word-of-mouth recommendations.
Workflow example 3: Content creation workflow
A content creation workflow entails the process of generating and developing material for various purposes. Here we present an illustrative example of such a workflow:
| Task | Responsible | Deadline |
|---|---|---|
| Topic Research | Content Writer | Day 1 |
| First Draft | Content Writer | Day 3 |
| Editing | Editor | Day 4 |
| Proofreading | Proofreader | Day 5 |
| Graphics Creation | Graphic Designer | Day 6 |
| Review and Finalization | Content Writer | Day 7 |
This workflow example demonstrates the sequential steps involved in content creation, starting with topic research and ending with the final review. Each task has a designated responsible person and a specific deadline for completion. By following this structured workflow, content creators can ensure a systematic approach to content development, resulting in high-quality output within the assigned timeframe.
Pro Tip: Regularly communicate with the team members involved in the content creation process to maintain clarity and ensure smooth progress.
Why did the content creation workflow cross the road? To reach the end before the readers could escape!
Description of the content creation workflow
Content creation is a must for any process that requires making and developing important info for several purposes. It needs a methodical approach to guarantee accuracy, quality, and effectiveness in the end product. Let’s take a closer look at the content creation workflow process.
To explain the content creation workflow, we can use this table:
| Stage | Description | Responsible Party | Timeline |
|---|---|---|---|
| Content Planning | This stage consists of identifying the goal and purpose of the content, conducting research, and creating an outline. | Content Manager | 1 week |
| Content Creation | Here, the actual content is produced based on the planning stage. It may include writing articles, designing graphics, or creating videos that match the intended message. | Copywriters | 2 weeks |
| Editing and Proofreading | The content goes through extensive reviews to make sure accuracy, consistency in tone and style, correct spelling and grammar mistakes, as well as complying with brand guidelines. | Editors | 3 days |
| Visual Design | In this phase, visual elements such as images or infographics are designed or picked to boost the overall look of the content and make it more attractive for the audience. | Graphic Designers | 1 week |
| SEO Optimization | The content is optimized for search engines by including relevant keywords, meta tags, and suitable formatting techniques to increase its visibility in search engine results pages. | SEO Specialist | 2 days |
| Publishing and Promotion | When everything is ready, the final content is published across various platforms like websites or social media channels. It is then publicized through targeted marketing strategies. | Marketing Team | Ongoing |
In addition to these stages, it’s essential to note that collaboration among team members is vital throughout this workflow process. Effective communication and a clear understanding of roles and responsibilities help create successful content.
Digging deeper into the content creation workflow, we realize its significant role in achieving organizational objectives. By making engaging and educational content, businesses can become thought leaders in their industry, bring in a bigger audience, and drive meaningful engagement with their target market.
A study done by Content Marketing Institute shows that 88% of B2B organizations use content marketing as part of their total marketing strategy. This shows the importance of an effective content creation workflow in modern business practices.
Step 1: Topic research and ideation
In today’s digital world where things move swiftly, content creation is a must-have for any successful marketing plan.
This is essential for creating content that captures your audience’s attention. To begin this process, you must understand your target audience and their preferences. Start by doing thorough market research, gathering data on what’s trending in your industry, and inspecting competitors’ content strategies. This will help you to identify knowledge gaps and areas of opportunity.
Now it’s time to brainstorm ideas. Think unconventionally and explore different perspectives on a specific topic. Interview industry experts or survey your audience to acquire insights that can boost your content creation procedure.
After compiling a list of potential topics, evaluate them according to their relevance to your audience, search volume, and competition level. Pick a topic that reflects your brand values and expertise while also having the potential to bring organic traffic.
Step 2: Content planning and outline
Effective content planning and outlining is vital. It guarantees that all necessary points are completely comprehended prior to commencing writing. An organized outline is like a map, guiding writers during their imaginative journey while keeping the end result consistent and straightforward.
If you want to plan and outline your content, adhere to these three easy steps:
- Recognize the purpose of your content. Figure out the goal and message that you want to pass on to your readers. Comprehend their requirements and adjust your content as required.
- Research and collect data. Execute an exhaustive investigation on the topic, acquire related data, and investigate various reliable sources. This will aid you in creating complete and well-informed content.
- Arrange your ideas. After collecting the required information, arrange your thoughts by producing an outline. This will provide your content a rational flow and make it simpler for readers to understand.
Moreover, when planning and outlining your content, remember to take into account any unique elements that are exclusive to your target audience or subject matter.
Step 3: Writing and editing
Writing and editing is vital in content creation. It means producing attractive, engaging content that captures the reader’s attention and conveys the message well. Here are the steps to take:
- Step 1: Goals – Before you start writing, make sure you know what you want to achieve. Identify key points and research if needed.
- Step 2: Outline – Put together an outline or skeleton of your content. This helps with organizing ideas and maintaining a logical flow. Jot down subtopics for each main section.
- Step 3: Drafting – Write based on your outline, and keep your target audience in mind. Make sure to express your message clearly and concisely.
- Step 4: Editing & Revising – After you finish drafting, review and revise your work. Check for grammar, spelling, and punctuation errors. Take out any unnecessary info for better readability.
In addition, maintain consistency in tone, style, and formatting. Breakdown long blocks of text into briefer paragraphs. And proofread before publishing to reduce mistakes.
Now that you know the importance of writing and editing, put time and effort into this step. Your well-crafted content will engage readers and leave a lasting effect. So, take control of your writing process and let your words make an impact! Start creating amazing content by following these steps for effective writing and editing!
Step 4: Publishing and promotion
Maximize the reach of your content. Here’s how:
- Publish on relevant platforms. Pick where your target audience hangs out and optimize for visibility.
- Social media is key. Share your content across channels. Ask questions, run contests – get people engaged.
- Try email marketing. Build an email list of interested readers. Send newsletters about your content.
- Reach out to influencers. Identify people in your niche for collaboration. Create content that works for both your followers.
- Guest blogging. Write posts for popular blogs in your industry. Include links to your content.
- Monitor and analyze. Use analytics tools to measure performance. Adjust strategy based on data insights.
These steps can help your content get recognition, reach a wider audience, and drive engagement. Don’t miss out! Begin implementing these promotion strategies now and watch your reach soar.
What Are Workflow Examples
Workflow management is essential for optimizing efficiency and productivity. Automation and streamlined processes can reduce errors and delays. Examining workflow examples can help businesses spot areas for improvement and modify strategies.
To stay competitive, businesses must continuously evaluate and update workflows, embracing new technologies and approaches. Exploring different workflow examples and identifying opportunities for optimization is crucial. Otherwise, businesses may miss chances for growth and improvement.
So, seize the moment! Take action now. Unlock the full potential of your organization’s workflow capabilities. Don’t let fear keep you from embracing change. Dive into the world of workflow examples today!
Frequently Asked Questions
 Q: What are workflow examples?
A: Workflow examples are specific instances or scenarios that demonstrate how a sequence of tasks or activities is structured and completed within a particular process.
Q: Why are workflow examples useful?
A: Workflow examples help in understanding and visualizing complex processes, facilitating process analysis, streamlining operations, and identifying areas for improvement or optimization.
Q: Can you provide some workflow examples?
A: Sure! Here are a few common workflow examples:
- Order processing workflow: This includes steps like order placement, order verification, fulfillment, and shipment
- Content approval workflow: Involves content creation, review, editing, and final approval
- Employee onboarding workflow: Covers tasks like document collection, training, equipment setup, and HR formalities
- Bug tracking workflow: Includes steps such as issue identification, assignment, resolution, and verification
Q: How can I create a workflow example?
A: To create a workflow example, identify the process you want to represent, break it down into sequential tasks or stages, determine the order and dependencies of these tasks, and visualize the flow using appropriate workflow diagramming tools or software.
Q: Are workflow examples industry-specific?
A: No, workflow examples can be found in various industries and sectors. While certain processes may be more prevalent in specific industries, the concept of workflows can be applied universally across different domains and businesses.


Leave a Reply