How to Use Styles in a Word Template?

Styles in Word templates are a powerful tool. They let users format documents with just a few clicks. Saving time and effort, they also ensure a professional look. How to use styles in a word template.
Get styles in Word template

IT Policies and Procedures Template Manual | ABR34M Information Security Policy Manual
There are 2 types of styles: built-in and custom. You can make global changes, like changing all headings from blue to red at once. This is especially useful for big documents or collaboration.
Styles can also help generate tables of contents. By applying heading styles throughout, Word can create one automatically. This saves time and ensures accuracy.
Lastly, styles can improve accessibility for people using screen readers. Applying the right heading styles and formatting features makes it easier for them to navigate through your document.
What are styles in Word template?
Styles in Word templates are pre-defined formatting options. They let you quickly apply consistent and professional-looking formats to your documents. This streamlines the process of formatting, as it provides a set of predefined formats for headings, paragraphs, titles, and other elements.
Let’s consider the importance of styles in Word templates. Imagine you need to create a report for a business presentation. Without styles, you would have to manually format each heading and paragraph.
This can be time-consuming and lead to inconsistencies. However, with styles in Word templates, you can easily apply a formatting theme throughout your document with just a few clicks.
Picture a table with multiple columns. The first column has different headings. Now let’s explore unique details about styles in Word templates. These pre-styled formats save time and ensure consistency across all documents in a project or organization.
You can use built-in or custom styles to maintain a professional look and make it easier for others to collaborate or edit your work without ruining its aesthetic.
Why use styles in Word templates? Because consistency is key!
Why use styles in Word templates?
Styles are the secret to creating a professional, consistent look in Word templates. Use them to format text, headings and paragraphs with ease. This way, you’ll maintain a cohesive design throughout your document, ensuring clarity and readability for your audience.
Styles save time! No need to manually adjust each element. Instead, use predefined or custom styles, quickly modifying the appearance of different sections. Plus, you get flexibility in customization – change font types, sizes, colors and spacing. Also, when working with others, styles make sure everyone follows the same formatting guidelines.
And there’s more: generate an automatic table of contents based on the defined heading styles. No need to manually update the table of contents if elements are moved or added.
Incorporating styles into Word templates is a great way to edit documents while keeping formatting uniform. Modifications are made universally, not section by section.
Microsoft Office Support says that using Word templates with built-in styles increases productivity and consistency. So make sure your template has predefined styles and become the wizard of document formatting!
How to access and apply styles in Word templates?
Accessing and applying styles in Word templates is an essential skill. Here’s a step-by-step guide on how to do it:
- Open the template by double-clicking on it.
- Locate the Styles pane on the right side of the window.
- Browse and select a style from the list.
- Modify a style by right-clicking on it and selecting “Modify”.
- Apply styles throughout your document.
You should consider individual preferences and document requirements when choosing styles for specific sections. This will ensure clarity and enhance readability.
Microsoft Word has evolved since 1983, when it only offered basic fonts and limited customization options. Later, styles were introduced to simplify document formatting.
Leverage the power of styles in Word templates to create professional-looking documents while saving time and effort. Level up your Word style game and make your templates more stylish than your ex’s new haircut!
Advanced techniques for using styles in Word templates
Let’s look at some examples of advanced techniques. You can use the table feature in Word to present sales data for different regions. Make a table with three columns: “Region,” “Sales Figures,” and “Percentage Increase.” List regions like North America, Europe, and Asia in the “Region” column. Show actual sales figures in the “Sales Figures” column. And calculate and display the percentage increase for each region in the “Percentage Increase” column.
Also, you can use headings styles such as:
- Did you know? Microsoft introduced Styles in 2007 with Word 2007. This update allowed users to apply consistent formatting across their documents quickly. Microsoft has kept adding to and refining this feature since then.
Styles make documents look so cool that the words themselves put on sunglasses!
Tips and best practices for using styles effectively
For Word templates, styles are essential for creating professional and structured documents. Here’s how you can make the most of them:
- Be consistent: Use the same style throughout your document for a unified look. This includes headings, subheadings, body text, and captions.
- Organize by hierarchy: Arrange the content hierarchically using various heading styles. This helps readers navigate and makes the document look better.
- Edit with ease: Apply styles to text so you can edit formatting quickly. Saves time and keeps consistency.
- Customize for impact: Explore different style options to find the right combination. Try fonts, colors, indents, and spacing for a visually appealing document.
And don’t forget:
- Make sure fonts and line spacing are readable.
- Use tables or bullet points in paragraphs for clarity.
Styles are extremely powerful for creating great documents. The right choice can dramatically improve the presentation of your document.
A colleague once spent hours manually adjusting font sizes in his report. He then found out about Word’s styles feature – with a few clicks, his report became a masterpiece. From then on, he used styles for all his writing.
So next time you’re facing formatting issues, use Word styles and make your documents look effortless and elegant!
Styles in Word template
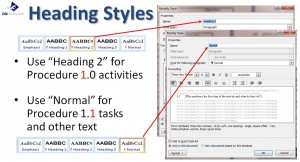
Procedure Heading Styles
Styles in Word templates provide a great way to control the look and feel of documents. They let you easily apply consistent formatting across all of the document. By using styles, you can alter font, font size, color, alignment, and other formatting elements quickly.
Plus, styles enable you to make custom templates with headings, subheadings, quotes, and more, all with predefined styles. This makes it simple to maintain the same look across the document or over multiple documents.
Styles also make it simpler to update the formatting of the document without going through each section. For example, if you change the font or font size for headings, you can just update the heading style one time and all headings will update automatically.
Styles also provide more flexibility when changing the format of the document. You can easily make new styles or modify existing ones to suit your needs. This allows for customization while keeping consistency in the document.
To sum it up, using styles in Word templates boosts both efficiency and aesthetics. With some clicks, you can have a professional-looking document that looks great and is easy to read.
Pro Tip: Take advantage of the style galleries and quick access toolbar for speedy application and changing of styles.
Frequently Asked Questions
 1. How do you apply a style in Word template?
To apply a style in a Word template, select the text or paragraph you want to apply the style to. Then, go to the “Home” tab, and in the “Styles” group, click on the desired style. The selected text or paragraph will now be formatted according to that style.
2. Can I modify existing styles in a Word template?
Yes, you can modify existing styles in a Word template. To do this, right-click on the style you want to modify in the “Styles” group on the “Home” tab. Select “Modify” from the context menu, and make the desired changes to the formatting options. Click “OK” to save the modified style.
3. How do I create a new style in a Word template?
To create a new style in a Word template, select the text or paragraph that you want to use as the basis for the new style. Then, go to the “Home” tab and click on the “More” arrow in the “Styles” group to expand the styles gallery. At the bottom of the gallery, click on “Create a Style”. Give your new style a name and customize its formatting options. Click “OK” to save the new style.
4. Can I delete a style from a Word template?
Yes, you can delete a style from a Word template. To do this, right-click on the style you want to delete in the “Styles” group on the “Home” tab. Select “Delete” from the context menu. A confirmation dialog will appear, asking if you want to delete the style. Click “Yes” to delete the style.
5. How do I apply a style to a specific section in a Word template?
To apply a style to a specific section in a Word template, select the text or paragraph within that section. Then, go to the “Home” tab and choose the desired style from the “Styles” group. The selected section will now be formatted according to the chosen style.
6. Can I customize the styles in a Word template according to my preference?
Yes, you can customize the styles in a Word template according to your preference. After applying a style, right-click on it in the “Styles” group or go to the “Home” tab and click on the “Styles Pane” button. From there, click on the small arrow icon next to the style name and select “Modify”. Customize the formatting options as desired and save the changes.


Leave a Reply